Take control of a user’s server
Hub admins can unilaterally perform actions on a user’s server via the Administrator’s Panel. These are primarily used to debug a user’s session easily.
You can access the admin panel by clicking the Admin button in the top bar
in your hub control panel. Alternatively, you can go to this URL in your
browser: https://<your-hub-url>/hub/admin.
Access a user’s server
Accessing a user’s server is useful when trying to debug or reproduce an issue they might have. This facility is available to admins via the admin panel.
In the admin panel, you can click Access Server to gain control of a user’s currently running server. If it isn’t running, you can click Start Server first and wait for it to start.
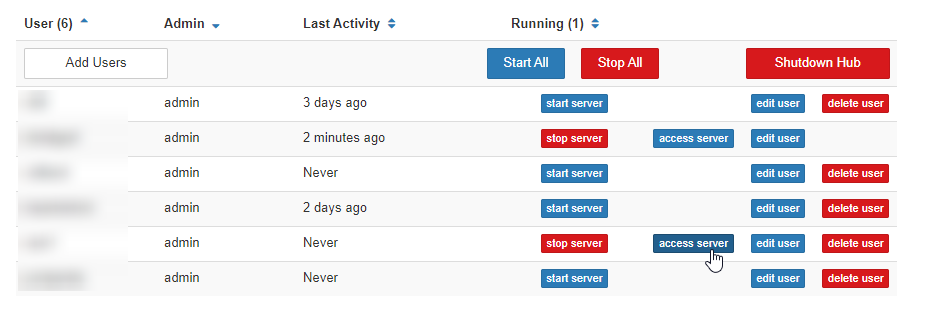
Clicking Access Server will allow you to control the user’s session.
This will bring you to the default interface that the user would have seen if they had just logged into the hub. From here, you can navigate to the notebook the user has reported issues with, and help them debug.
Access user logs
For user images that are built with repo2docker and that do not define a custom Dockerfile, the logs of each user’s Jupyter server are located in their home directory, at ~/.jupyter-server-log.txt.
These contain information about every event that occurred as a part of a user’s session, and are useful for debugging unexpected errors and problems.
For example, to print the contents of your own user server log:
Open a terminal (e.g., choosing Terminal from Launcher in JupyterLab)
Run the command:
$ cat ~/.jupyter-server-log.txt
To access a different user’s server logs, you can access their server and run the same command above to print their logs.
Stop or start a user’s server
Sometimes, you need to just turn a user’s server on and off. You can also do this from the admin interface, by hitting the Stop Server button, waiting for the server to stop, and the Start Server button again.
This is particularly useful when their session might have gotten out of whack by packages they’ve installed temporarily that screwed up the default, since a restart will wipe the slate clean.
Stop user servers after inactivity
To ensure efficient resource usage, user servers without interactive usage for a
period of time (default 1h) are automatically stopped (via
jupyterhub
“Culling a user server” has the same effect as stopping a user
server, but should be distinguished from “culling a
kernel” inside a user server. jupyterhub
Stop user servers after maximum age
As a failsafe jupyterhub
Stop user kernels after inactivity
In addition to the user server, there may also be culling at the kernel level. The kernel is the thing that actually “runs code”, and a kernel without any activity for some time means that somebody has not executed code in that time.
By default, kernels will be checked for activity every 5 minutes.
All kernels that haven’t shown activity in in the last hour will be stopped by the jupyterhub
This window can be configured if you’d like to change the window of inactivity needed before user kernels will be stopped. See the Infrastructure guide for some documentation on this.
Disable hub access for all users
In some cases, you may want to temporarily disable hub access for all users. For example, if you are concerned that users on your hub are taking inappropriate actions, and you wish to stop all activity before investigating.
To prevent all user sessions from starting, contact 2i2c support to request that your hub be configured with a user image that does not start.
In the meantime, you can stop all user sessions from your Administrator panel:
Go to
{{ your hub URL }}/hub/adminand click Stop All.This will stop all currently running user sessions.